

First learners usually try to get a guitar within their budget, so it is quite common to find less-quality instruments for a cheaper price; as Fender Stratocaster is one of the most famous and desired models, you will find a wide variety of them.
However, due to many reasons such as wood, electronics, and hand labor these guitars could seem poor for those who have been playing for a while.
Although the easiest way to solve this situation is going for a superior-quality guitar, not every player is able to do it, so I will leave you some modifications you can do to your affordable strat and improve not only its tone but also how it feels.
The upgrades will be economical adjustments that you might do using things you have at home or spending just a couple of bucks, the idea is to keep it simple and cheap.
The 6 best upgrades for an affordable strat are:
- Setting a correct nut height
- Adjusting pickup height
- Insulating electronics
- Reducing unwanted resonance
- Locking the bridge
- Adding a tone control for the bridge pickup
If you can’t afford a high-end instrument, there’s no point in saying “go get better pickups” or “just change your tuning pegs”, otherwise, your budget will be constantly increasing with each modification you do.
Having said that, I hope you enjoy this article.
1. Set a correct nut height for better tone and playability
In cheap guitars, manufacturers tend to save not only on components but also on hand labor.
Because of that, the nut is not precisely what we call top-notch, instead, is common to find low-quality nuts, generally made of plastic which is poor material.
These inferior quality parts typically influence the height of the strings, making them sound dull and out of tune, even affecting your comfort while playing.
To solve this issue, you simply have to do is file each string slot.
To do that move the string out of the way, take the proper size file to perfectly fit the space, and reduce carefully the height by doing some quick passes.
Before continuing with the next string check that the height is the desired, and lubricate the slot with some graphite powder (if you don’t have this at home you can just use a pencil tip) then, repeat the process for every slot.
This adjustment will provide a more pleasant sensation while fretting and, what is more, it will help the guitar sound in tune.
2. Adjust pickup height to get a balanced output
As affordable guitars are assembled without attention to detail, an adjustment in pickup height may be needed.
This modification will always vary from player to player, some guitarists like how it sounds when single coils are near to the string while some others will prefer more space between pickups and strings.
Although this modification is up to the player’s preferences, the rule of thumb is, that the side of the pickup which takes the higher strings’ vibrations should be closer to them while the opposite side of the single-coil should be further from the strings.
The objective of this mod is to balance between lower and high strings, according to the mass of the strings the vibrations vary.
In thicker strings, the vibration is higher so is the magnetic field too, in thinner strings the vibrations aren’t so strong so they need the pickups nearby.
3. Insulate electronics to avoid interference
In high-ended instruments, we can notice that the insulation is perfectly done but this is not the case in their cheaper counterparts, therefore, it is important to do it to reduce unwanted noises.
To insulate your guitar you will need some aluminum foil paper, you will have to cover the internal side of the pickguard with it plus the routed pickup’s spaces.
Once you cover and paste it, reinstall your pickguard, and you will notice that the interferences will have been reduced.
This foil guitar shielding will protect your guitar from electromagnetic interference, reducing or avoiding noises.
4. Reduce unwanted resonance from springs
Following the line of the previous tip, eliminating unwanted resonance is something that will give you a better resulting sound.
If you pay attention you will realize that in the back part of the body there are some springs that hold the bridge (usually three springs but this varies from strat to strat, sometimes two or more).
Those metal parts vibrate when the instrument is played which produces resonant sounds that are collected by the pickups.
To eliminate or reduce that resonance some players put pieces of insulating sponge or foam under the springs and, sometimes, in the routed sections under the pickups.
The foam works as a barrier and prevents the vibrations to pass through it, this tip added to the internal insulation will significantly minimize undesired noises.
What is more, you can get this fantastic material easily in every hardware shop or even online.
5. Loosen bridge tension or lock the bridge for better tuning stability
To decide whether to loosen or lock the bridge of your guitar you should bear some points in mind.
Firstly, not every strat bridge is the same, some of them came with a tremolo bridge while others are designed with a fixed bridge, if your guitar has a tremolo, you could decide between one or the other but if your bridge is fixed, you will be just able to lock it.
In the case of the latter, what you simply have to do is to get a piece of wood that matches the hole between the bridge and routed space at the back of the instrument and place it there, you can also put some foam to reduce vibrations or even add more springs to hold the bridge steady.
By doing that, you will get a better and more stable tuning because the bridges in cheap guitars are not made of high-quality materials.
In the case of a tremolo bridge, you can lock it by following the same process but you could also loosen the bridge to get a brighter, cordal sound.
That occurs because the wood employed in building this type of guitar is prone to absorb the sound, which commonly blurs it.
To loosen the bridge you have to carefully unfasten the two screws that hold the bridge, unscrew them until the bridge is floating above the wooden body, then check the tuning and retune your guitar if necessary.
The tone will become shinier but the tuning could be a bit unstable at first, check if you can keep your instrument in tune, otherwise, I’d rather try the locking bridge process.
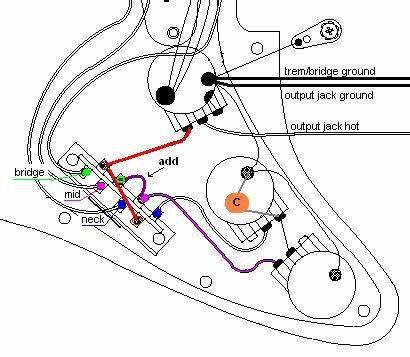
6. Add a tone control for the bridge pickup
This last tip is regarding the electronics of the instruments, you may think that you are not aware of how a guitar works electronically but this mod is quite simple and so easy to do that you could do it even if you don’t have experience.
It consists of improving the guitar’s equalization, the tone knobs of Stratocasters don’t usually control the tone in the bridge pickups, however, you can change that by soldering a single tiny wire.
Once you access the electronic section inside the guitar, what you have to do is look for the wire which controls the tone of the pot closer to the bridge.
There, you will commonly find three connections, the first one has to do with the first pot, the central one with the second tone pot and you will notice that the third is an empty space.
What you have to do is solder an extension of the wire, also called “bridge”, from the second to the third space, I suggest you check everything is working before you assemble it all again.
This mod could be a bit more complicated to do because you will need a 30-watts soldering iron, a piece of wire, and a bit of tin solder but don’t worry, I’ll leave you a tutorial plus a diagram for you to have a better understanding of the process.
Link to the tutorial:
Diagram:

Hello there, my name is Ramiro and I’ve been playing guitar for almost 20 years. I’m obsessed with everything gear-related and I thought it might be worth sharing it. From guitars, pedals, amps, and synths to studio gear and production tips, I hope you find what I post here useful, and I’ll try my best to keep it entertaining also.