
Every guitar player needs to master chords. Yes, even if you’re fast as lightning and can play 120 notes in five seconds, you need to learn chords.
Why? Well, chords and harmony in general are the basis of music and playing chords will make you a better guitar player in every sense of that expression.
I know what you’re thinking; who’s got the time to learn the zillion chords available in guitar? Well, that’s why you came to this article, to the right place.
I’m condensing three decades of guitar playing into tips that will help you learn everything you need about chords in record time. Then, you can go on and play all the scales, solos, and riffs you want (and they will sound much better).
The 21 tips you need to follow to learn to play the guitar faster are to take a mental picture of every chord, engage your muscle memory, select a target finger per chord, and pick each string individually.
Also, you should start with the CAGED chords and their minor alternatives, and practice regularly using the closed-eyes memorizing technique and the 3 basic finger position tips.
Furthermore, you should also use chords flashcards, learn some tunes to have fun, break chords into triads and find new places to play them.
Moreover, you ought to also break practice time in two, set SMART Goals, push it to find the dopamine high, keep improving and learning new chords, and never shy out from difficult chords.
Additionally, you should become an active music listener, assess your knowledge and progress monthly or trimestral, combine different sources of media, and don’t underestimate the power of mnemonics.
Finally, you should also mind the environment in which you practice.
Did you enjoy that sneak peek? Well, then you’re going to love the full explanation of these road-tested, tried-and-true tips that will make you a better guitarist in record time.
Are you ready to upgrade your game fast?
Well, read on because we have no time to lose!
1. Take a Mental Picture
We, guitar players, deal with things on the fretboard of the instrument by remembering shapes. Yes, although we don’t call them “old lady” and “bear claw” like Phoebe tries to teach Joey, we remember the shape of the chords rather than their notes.
We can use this to our advantage and speed up the process of remembering the chords. Yes, once you remember the shape of a chord and relate it to its name, you’ll be able to call it up whenever you want to easily.
So, the first thing you need to do is to form these four shapes on your guitar:


Take a look at the guitar’s fretboard and try to take a mental picture of what you’re seeing. The idea is to remember the shape in your head, not just the instruction so take at least 30 seconds for that first thorough look.
Secondly, just make some pressure and release. Repeat this action five to ten times and let this simple exercise build a physical image of the chord.
Once you’ve done this for the first chord, it’s time to move to the second, the third, etcetera.
Bear in mind that mental pictures can be hard to build, so give this method at least three days to do its job by practicing it daily.
2. Engage your Muscle Memory
Muscle memory is the ability to reproduce certain movements or physical techniques without giving them any conscious thought.
Oh my God, how do you build this superpower? Well, easily, through repetition.
Yes, this is something that athletes of many disciplines and artists do to strengthen their brains’ communication paths and become quicker and better.
There is a technical explanation for this; the name of this phenomenon is myelination.
This complex term means that the more you repeat a certain action (and send the impulse through the same pathway in your brain) the quicker the body can react to that impulse.
In other words, the more you repeat the exercises I’ll give you below, the easier and faster your fingers will set the chord on the fingerboard. It is automatic, you won’t even notice building it and, all of the sudden, your fingers will find their way faster.
So, choose one of the 4 chords given above and form it over the fretboard.
Exercise 1
Loosen the pressure and take the fingers slightly off the fretboard; just a bit, not entirely. The trick here is that you shouldn’t disarm your chord shape when you take your fingers off the strings.
Then, put them back on.
Do this 25 times every day.
Exercise 2
We’ll take this a little further for exercise 2. You need to take the entire hand off and put it back on in the shape of the chord you chose.
This will also help you relax the fingers of the fretting hand before getting a cramp.
Yes, you guessed it; you should do this 25 times every day.
You can do exercise 1 and exercise 2 in a row and move from chord to chord to make it more varied and keep it fun. Just trust your body and let it build that muscle memory so chords will come to you easier and faster.
3. Select a Target Finger per Chord
The target finger technique is very easy and it can be a game-changer to learn chords.
What you need to do is choose one of the fingers and establish a sequence to put together the chord of your choice. For example, if you choose to put together an E major chord, you can follow the following diagram.
Bear in mind numbers don’t mean what finger you have to use, but the order in which to use them.

Once you practice it a lot and the first sequence is cooked, change the target finger. You can follow these diagrams; again, numbers are the order in which each finger goes.


Yes, you guessed it again; you need to repeat this at least 25 times per target finger.
Finally, the final stage of this exercise is to put all the fingers in at the same time and form the chord perfectly. Don’t try this immediately after you’ve done your 25 repetitions per finger but in a different practice session, several days after you started.
You’ll see it will gradually become easier and you’ll be placing chords at once in no time.
As a bonus track: strum the chords every time you form them on the fretboard for about 10 seconds. Make sure every string is doing its part for the overall sound.
4. Pick Each String Individually
This is a technique that will save you years of practice time and will also make you a better-sounding, studio-ready guitarist because your chords will ring clear as water.
The idea is very basic and cascades from the last exercise. We’re going to work string by string so you can check that each one sounds perfectly in tune.
These are common issues:
- String Buzzing – If the string you’re playing is buzzing, don’t panic; there are three actions you can take to correct it. Firstly, check that your finger is close to the fret but not on the fret. Secondly, make sure you’re not slightly touching the string with any of your other fingers. Finally, make sure the fretting finger is making enough pressure and not too much.
- Dead Sound – If a string is making a dead sound is because you’re somehow muting it. This is very common and there is a tested-and-true way to fix it; another of your fingers is touching the wrong string strong enough to make it stop vibrating. Just identify which finger is doing this, and try to use its tip to fret the string.
When applying this to barre chords, the trick can be to use the side of your finger to make the barre chord instead of the palm side of it. Not only because it is harder, but also because it is more even and works better as a human capo.
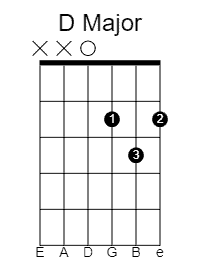
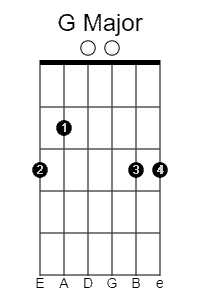
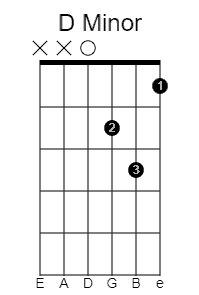
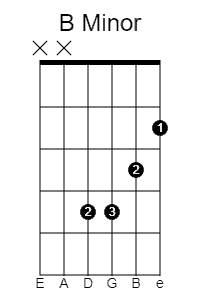
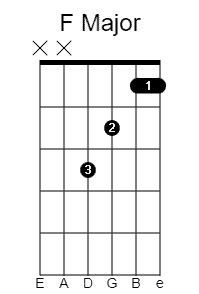
5. Start with the CAGED Chords and Their Minor Alternatives
I don’t know if you’re familiar with the CAGED system, but the chords in it will cover at least 70% of your playing (unless you’re into jazz or extreme metal, for example).
This translates into a better bang for the buck; by learning 8 chords you can cover a lot of sonic ground. In other words, you can play thousands of songs with only a handful of easy-to-learn chords.
What about that for fast domination of the guitar, uh?
Well, let’s take a look at the CAGED shapes with their minor alternatives. Oh, and no need to get anxious about the rest of the chords, I threw in a bonus track with some easy-to-play shapes for the more complicated chords.
Yes, I know, you’re welcome.
But let’s get started, there’s no time to lose. The first thing you need to do is form these four shapes on your guitar:


Now the minor alternatives:


Now, it’s time for our bonus track: these are the rest of the chords in easy shapes.


Now you’re ready to practice these chords at least 25 times each following the tips we saw before. With them, you can play any song that comes to mind.
6. Practice Regularly
Science has discovered certain hacks that can work as shortcuts in our brains. These hacks can help us store information in it much faster.
Wait, isn’t that what we’re trying to do here?
Well, one of these hacks is that repetition in consecutive days is better than repetition concentrated in one day. Therefore, practicing 15 minutes a day is better than 2 hours once a week.
But how can you practice for only 15 minutes and expect to be better at guitar?
Well, the trick is to know what to practice and to have consistency in your practice. I am here to help you, thus, I’ve created a powerful tool that will help you use your time wisely and maximize your ROI (Return on Investment).
This can be a perfect example of what your schedule could look like:
| DAY & TIME | 5 Minutes | 5 Minutes | 5 Minutes |
| MONDAY | Mental Pictures | Muscle Memory | Picking Each String |
| TUESDAY | CAGED Major Chords | CAGED Minor Chords | CAGED Seventh Chords |
| WEDNESDAY | The Closed-eyes Technique | Chords Flashcards | Diminished Chords |
| THURSDAY | Listen to Music Actively | Practice the Hand Position | Create mnemonics |
| FRIDAY | Asses your Weekly Advance |
By the end of the day, you practiced 12 different techniques that will make you a better player. It is difficult to go through so much information if you’re practicing 2 hours in a row.
Finally, it is important to say that this is just a minimum; you know how much time a day you can devote to your guitar playing. Use this chart and make the most out of it.
This is a clean one in case you want to copy it.
| DAY & TIME | Minutes | Minutes | Minutes |
| MONDAY | |||
| TUESDAY | |||
| WEDNESDAY | |||
| THURSDAY | |||
| FRIDAY | Asses your Weekly Advance |
On the weekend, just use your playing time to have fun and play whatever you feel like. “All work and no play make Jack a dull boy!”
7. The Closed-Eyes Memorizing Technique
The story of James Nesmeth is quite peculiar. He was an average golfer imprisoned in the Vietnam War. He was put in a very small jail and wasn’t allowed to talk to anybody.
That lasted for seven years and the Major spent that time playing his favorite golf course every day in his head to avoid going insane. He imagined everything to the last detail even the clothes he was wearing, the smells, and the sounds.
This lasted for seven years.
Upon his return to his country, he went golfing at his favorite course and shot a 74, which meant almost 20 shots below his average before being caught. He hadn’t swung a club in almost 7 years and became a far better golfer by envisioning the act of doing it for seven years.
Well, this story isn’t in vain; it is to tell you that you can do something very similar with your guitar-playing abilities. Indeed, this tip is linked to the first one; here you’ll use the mental pictures you created then.
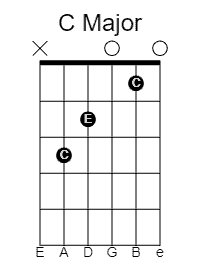
What you should do is memorize the chord diagram and its shape.
But that’s not all, for each of the chords, you need to answer these three key questions:
- What frets is it played on?
- What fingers do I use for each fret?
- How many strings are played?
In case your memory works better by writing things down, feel free to answer them in a written form.
For example, this questionnaire applied to a C major chord would be:
- What frets is it played on? It is played in frets 1, 2, and 3.
- What fingers do I use for each fret? The index finger goes on the second string first fret. The middle finger goes on the fourth string second fret. Finally, the ring finger goes on the fifth string third fret.
- How many strings are played? Five. All strings except the low E (6th string) should be played.
Now that you’ve done this, close your eyes and imagine playing it anywhere at any time, without the guitar, while commuting to work (not if you’re driving, though!), waiting in line for food, or even in bed before sleeping.
When you get home, pick up the guitar, close your eyes, and put your fingers in the shape of the chord. Open your eyes and see how accurate you were.
Fix whatever needs to be fixed and try again until you reach effortless perfection.
Yes, it’s as ridiculously simple as it is effective.
8. The 3 Basic Finger Position Tips
Many people commit basic finger position mistakes even long into their playing career. Indeed, it is something I have seen countless times in colleagues.
These are what we usually call vices, small bad habits that go undetected under the radar and stick to your playing for years.
So, right here and right now, we’re going to correct three of the most common vices you might already have as a guitarist.
Fixing these will not only help you play better, but you’ll learn faster as well because you won’t have to fight with the position of your hands.
Use the Fingertips!
Our fingertips have a starring role in guitar playing. Yes, they have enough meat and bone to be perfect to press the strings.
We are going to use the very top of our fingertips, the space that goes right under the nails. If you were to point your hands up to the sky, this section of your hand will be the one pointing straight up.
I know what you’re thinking and I agree; since we don’t use that part a lot, they usually hurt at the beginning. Moreover, you get that deep groove going through them!
Worry not and play on because all that effort will literally solidify in the shape of calluses that will make your fingers stiffer and will also take away any pain associated with playing.
So, make sure that you use your fingertips when fretting.
Close to the Fret to Avoid Buzzing or Pressing too hard
Pressing too hard on the strings will not only slow you down but will also sound out of tune. Yes, the more pressure you apply to a string, the higher it will go pitch-wise.
This can be translated into an out-of-tune performance just from pressing too hard. Nobody wants to play out of tune and I include both of us in that group.
So, to avoid that pitfall, all you need to do is to fret your strings in the sweet spot that is the closest possible to the fret without buzzing.
Once you find that sweet spot, keep in mind the need to use it every time you fret a chord.
Mind the Thumb
The muscle that is between your thumb and your index finger is crucial to play guitar better. Yes, this is the muscle that does all the effort when you’re pressing the strings.
At least, that is the way it should be working.
I’ve seen it used the wrong way more times than I can count. This is very easy to spot because the player’s fingertips go white from the pressure.
To avoid pressing too hard or doing an effort with the wrong muscles, you have to mind the thumb and place it at a height it can help you press effortlessly.
That perfect position is keeping it low behind the neck very close to the middle.
You’ll see that once you lower the thumb, your hand will automatically roll backward as your wrist moves outward. This will drastically help you fret with your fingertips too.
9. Chords Flashcards
Flashcards have been a standard studying technique for any discipline for decades. Yes, from lawyers to chemical engineers; most people rely on flashcards when studying to memorize a specific piece of information.
We’re going to use them here to memorize chords.
But how does the flashcards technique work?
Well, it really is very easy; all you have to do is create the flashcards and memorize them so you can spot them in any random sequence. So, copy the shapes of the chords we’ve seen so far following the next steps:
- Copy the diagrams for every chord in this post on a different piece of paper. You can even use post-it papers (as long as they are all the same color).
- Omit writing down the chord name on each card anywhere you can see it. On the opposite, write it down behind the card so you’d have to turn it around to figure out which chord you’re trying to play.
- This is an optional step: if you want to really use them a lot, I suggest you laminate each. That way, they will last longer and be easier to manipulate.
- Shuffle the cards in a way the resulting deck doesn’t follow any logic you could use to guess the chord.
- Pull out one card at a time and try to identify each of the chords just by their shape.
This technique helps you identify the chords by the way they look on the fretboard only, enhancing your capacity to call them back to your memory at any time.
10. Learn Some Tunes to Have Fun
Let’s spice up these tips selection by adding something that will surely make you enjoy your time playing further. Yes, we’re going to apply what we just learned to play some tunes and have some fun.
I’ve picked three very famous sing-alongs that will help you practice mostly open chords. You can expand this list as much as you like with bands you love.
Furthermore, to begin with, you should turn this 3-song list into a 5-song list.
“Sweet Home Alabama” – Lynyrd Skynyrd
This is an absolute bonfire classic that will help you put three very common chords into use. Yes, the chords for this song are D, C, and G throughout the tune.
There is an F major at the beginning of the solo, but the rest is only those three chords. Look for the song, play it along, and have fun!
“Bad Moon Rising” – Creedence Clearwater Revival
This song doesn’t even include an F, because the entire song can be played with only three chords: D, A, and G.
On the verses, you should play D, A, G, and D. For the chorus, the sequence changes to G, D, A, G, and D.
Yes, that’s it, so have fun!
“Wonderwall” – Oasis
We’re extending the number of chords to five, but don’t panic because they are chords you have already seen in this lesson. The chords you need are Em, G, D, A, and C.
For the verses, the sequence of chords is Em, G, D, and A.
The bridge (“And all the roads that lead you there…”) goes C, D, and Em with minor shifts toward the end.
Finally, the chorus goes like this: C, Em, G, Em. For the coda, that sequence changes to Em, C, Em, and G.
11. Get Technical; Break Chords into Triads and Find New Places to play them
All the chords we’ve seen so far are made of triads. A triad is a group of three notes played together.
Learning each of the triads that make the chords is like breaking the code because you can escape the “shape” system and start making chords everywhere on the fretboard.
Furthermore, remembering the notes that make them will make you remember the chords better because you no longer have to memorize the shape but simply remember three notes and their positions.
The more you use this technique, the more solid your knowledge about the fretboard will be.
I’ll get you started with five of them and let you fill in the rest.
- C Major – C – E – G
- D Minor – D – F – A
- E Major – E – B – G#
- G Major – G – B – D
- A Minor – A – E – C
Now it’s your turn to complete the rest of the chords.
12. Break Practice Time in Two
Modern-day life might not give you the possibility of canceling two hours of your schedule and dedicating them to practicing the guitar. That being said, most of us can get away with 15 minutes in the early morning and 15 minutes at night.
Yes, if you can practice in the morning and in the evening, you’ll experience a better acquisition and solidification of the info you’ve been practicing.
Moreover, you will very likely keep this information in your head for the rest of the day and, by the time the evening session arrives, it will be fresher.
Remember the case of the golfer imprisoned in Vietnam? Well, this technique will double the power of that approach.
13. SMART Goals
Establishing SMART goals is paramount to success. Here’s guitar legend John Mayer talking about goals and expectations some years ago in Berkley.
That’s exactly what we’re going to do here, we’re going to learn how to set our goals in such a way they become a motivational tool to measure our progress rather than a discouraging element.
These killer goals are called smart, not only because it’s very smart to use them but also because their name is an acronym. This acronym stands for each of the qualities of your goal:
- Specific
- Measurable
- Achievable
- Reasonable
- Time-bound
Let’s break down how to use them with an example:
Specific
A specific goal is clearer to envision, easier to pursue, and easy to measure. For example, a goal like “get better at playing guitar” is far too vague. Instead, you could set as a goal “being able to play all the major and minor CAGED chords” as a goal.
Measurable
For a goal to be measurable they need to have an exact measure you can assess easily with a tool. For example, “get better at guitar” can’t be measured because what does “better” mean?
That you can play more chords? That you know more songs?
Instead try to go for something like: “Play all the major and minor CAGED chords without checking.” That is something easily measurable.
Achievable
The goal you set has to act as a push forward, a motivation source rather than a stressor or an unattainable objective. Therefore, you need to break down big goals into smaller ones you can achieve.
For example, the goal: “playing Frank Zappa tunes” might be unachievable for a beginner guitarist. On the other hand, a goal like “play all the major and minor CAGED chords” can be the perfect motivational push to sit down and play them time and again.
Relevant
The road to becoming a great guitar player is long and winding and it will require you to attain a plethora of abilities. The next attribute of your goals is that they need to be relevant to the path you’re trying to take.
For example, if what you want is to master guitar chords, setting “learning the pentatonic” as an objective might not be relevant.
On the other hand, “learning all the major and minor CAGED chords” might prove to be a much more relevant step in the way.
Time-bound
We have been missing one very important ingredient in our goals. This final touch is what makes SMART goals a very powerful tool.
You need to set a time frame.
Moreover, this time frame you set must be in concordance with the A in the acronym; in other words, be achievable.
For example, if you would say “learn all the chords in the guitar by tomorrow” it would be an unachievable goal and will fail to be SMART (besides being too vague).
On the other hand, if you set “learn all the major and minor CAGED chords by next Friday”, you’d be establishing a perfect SMART goal.
Use this powerful technique with all the goals you set playing guitar and you’ll see that practicing toward a clear goal is better than random practice chunks with no real direction.
You’d be sailing toward the shore rather than floating at the wind’s mercy in the open waters.
14. Push it to find the Dopamine High
Artists, athletes, hobbyists, and anyone who pursues their passion do it partially because of the reward we get from our brains. Yes, serotonin, dopamine, oxytocin, and endorphins are our brain’s happy chemicals and they’re released in such scenarios.
I don’t know if you’ve experienced it, but we get these rushes of amazing emotion whenever we do something we enjoy thoroughly. For example, when you learn something new in guitar and can suddenly play it or buy a new effect pedal that sounds amazing.
Yet, that same high we get naturally tends to wear out with time; our body needs more stimuli to give us that rush again. Yes, we don’t get happy chemicals just because; we have to work for them.
So, the way to get the dopamine high on a steady basis (or close to it) is to keep pushing ourselves to learn more and more. Also, setting SMART goals and achieving them is another massive dopamine trigger.
Furthermore, don’t just take my word for it. Here’s a study about how practicing guitar releases dopamine in individuals made by the good folks at McGill University.
So, the more you trigger that dopamine high, the more you’ll be pumped to go on playing. Thus, don’t settle, and push yourself to your limits to keep your brain pumping those happy chemicals.
15. Keep Improving and Learning New Chords
Cascading from the previous tip, learning new chords is a crucial task to becoming a better player. Indeed, if you expand your chords catalog, you’ll find different flavors and will surely put them to use by creating exciting new music.
Furthermore, the bigger the catalog of chords, the more songs you’ll be able to play.
Remember what we said about the triads that make the major and minor chords? Well, the category we didn’t see when studying the triads was diminished chords.
Moreover, triads aren’t the only type of chords; other categories such as seventh chords take four notes.
Let me get this tip started for you; these are the CAGED chords in their seventh and diminished versions. Your homework is to complete the list with the missing chords.
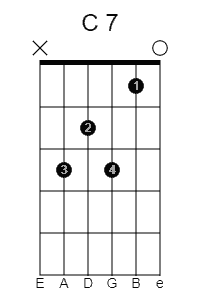


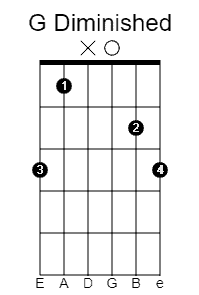
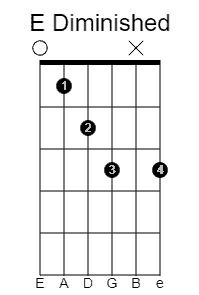

Seventh chords are generally easier to play than diminished chords, so make sure you start with them and then work your way to playing diminished chords.
Of course, as a welcome side effect, you’ll get the happy chemicals.
You’re welcome.
16. Don’t Shy out from Difficult Chords
This is something that cascades straight from the last tip to master the guitar faster. Chords in music are limitless. Well, not literally, but for most of us, chords are a territory too vast to cover.
If you take a 24-fret neck you get 2210 different chords!
This makes it easy for some of us to shy out from the really difficult chords. Yet, despite being common, it is a major mistake that will slow down your learning process.
By learning new chords, you’ll get a better understanding of music’s structure and also of its different flavors.
Although this item is something that happens naturally because your chords catalog is always growing and hence, nourishing, if you intentionally pursue that evolution as a player, you’ll get there faster.
In other words, instead of waiting to come across a 7th chord, or a 9th chord, or a sus4 chord in a tune you’re playing by chance and learn it then, explore the chord universe by your own means.
Trust me, it will save you years of stumbling in the dark, and you’ll also be able to close knowledge gaps you might have about harmony.
So, don’t be like me; don’t shy out of difficult chords. They will keep you playing and learning, progressing faster.
17. Become an Active Music Listener (especially when napping!)
Listening to music actively means going beyond the average listener and spotting what makes a song great. The idea is to unveil the gears behind the curtains that make it all work.
So, listen for chords, chord changes, melodies, and notes. You can do this all the time, even as you fade into a comfy nap at home.
Furthermore, we all know that everybody loves a good nap. Yet, many of us, even if we get the chance to do it, feel guilty because we’re wasting time.
But what if I could tell you that every time you take a power nap, you can also use that time to improve your playing? Sounds great, doesn’t it?
Well, according to a study from Northwestern University, Illinois if you listen to the music you’re trying to learn while napping, you increase your chances of remembering that song much better.
Moreover, the study also states that the information that you acquire in your waking hours can be reactivated while you’re napping, which promotes memory stabilization.
This is, without a doubt, a double-benefit tip that will speed up your learning.
So, listen to music actively wherever you are and wherever you go; yes, especially when napping.
18. Assess your Knowledge and Progress Monthly or Trimestral
We saw in a previous tip how SMART goals can help you move forward faster in your learning. Well, part of these goals is to measure your improvements as a player in a given period.
Besides that, studies (such as this and this) prove that, when you assess your improvement and test yourself, the results of your efforts tend to be better.
But how can you assess the improvement you’ve made as a player?
Well, for example, let’s take our SMART goal: “learn all the major and minor CAGED chords by next week.” This is a weekly goal that needs to be followed by another SMART goal such as “learn all the seventh and diminished CAGED chords.”
If you follow this line, your monthly assessment should be related to the chords in the CAGED system. You need to assess that you can play the chords you set the objectives for.
So, for example, your assessment could be to form every chord on the fretboard without checking. Furthermore, you can even use flashcards as an assessment method.
Then, two months later, you can assess your progress by collecting your monthly assessments into a bigger test. For example, if you add the chords missing from the CAGED System, the songs you’ve been learning, and the notes that make each of the chords, you can have a trimestral assessment.
This assessment can measure your progress as a guitar player. Believe me, if you work hard, by the time you do your yearly assessment you’ll receive a cataract of pouring happy chemicals for the distance you’ve covered.
19. Combine Different Sources of Media to Solidify Information Better
The human brain is the most complex element ever found in the universe and still represents the final frontier for science. That being said, we have come a long way in understanding how it works and working out the hacks, shortcuts, and secrets.
A recent study confirms that, if we combine more than one source of media, information becomes more solid in our brains. This means that you have to choose more than one channel to make information assimilation much more concrete.
So, here are three ways you can combine media sources to make information sink in better.
- Play & Speak – For this first technique, you need to say the names of the chords you’re playing out loud as you fret them. Moreover, taking it to the next level could be to say the notes you’re playing with each of the chords you’re playing.
- Play & Write – Another technique that works wonders with this approach is to write the chords you’re playing. Yes, take a blank sheet of paper and write down everything you play. That way, you might solidify the information faster and better.
- Play & Sing – This is for those guitar players who can also sing. For this third and last technique, you have to sing the tonic of each of the chords you’re playing. This way, your brain will have two information sources to use for solidifying information.
Finally, let me add that this is important not only when acquiring the information but also when practicing it. So, try to apply one, two, or all of these approaches to your practicing sessions.
20. Don’t Underestimate the Power of Mnemonics!
Do you know what mnemonics are? The definition says that mnemonics are learning techniques that help the human brain improve the retrieval or retention of information.
These techniques can also help humans have a better understanding of any topic. Furthermore, they can also be vital to learning how to play the guitar faster.
It’s like a sign on the road that says shortcut!
So, in a nutshell, what this tip means is that you should create some mnemonics for difficult-to-memorize pieces.
This technique is very simple to learn and use. You can make as many mnemonics as you see fit, we’re going to start with one.
- Use the first letter of each word (or chord name) to create another word that is easy to remember. For example, if you want to remember about the CAGED system, you can simply think of the “caged” word and associate it with the adjective of being “caged”. That way, instead of remembering the C, A, G, E, and D chords, you can just remember a word.
- Another approach for the same technique is to form a sentence in which every word is created with the first letter of what you want to remember. For example, if you want to remember a song that goes G, C, D, A, and F you could remember “Go to Class During Autumn or Fail”.
Now, it’s your turn to find other mnemonics and apply them to the difficult things you want to learn.
21. Mind the Environment
The right environment makes your desire to practice grow. Moreover, consistency is the mother of progress, so you’ll be learning to play faster than you would if practicing was uncomfortable.
Yes, your environment plays a major role in your guitar playing; especially when practicing.
What recent studies and the prestigious Fender Company add to the discussion are the specific qualities that you should pay special attention to in your practice room.
These are:
- Mind the Lightning – A well-lit room is more inviting to study than a room in which your eyes have to struggle. Furthermore, if you are just starting, being able to see the fretboard is vital. So, whether you like natural or artificial light, make sure there’s plenty of it in your practice room.
- Quiet & Private – Keeping it quiet and private can help you develop as a player faster. Yes, not all of us feel as proud of our playing chops to practice with an audience. The same happens with distracting noises. Oh, and that includes the cell phone!
- Display your Instrument – This might seem like a minimal detail but it makes a world of difference. Believe me, if you have to take your guitar out of its case, bring the amp to the room, plug it in, take out the pedals, plug them in too, and finally play, you’ll do it less often. On the other hand, if everything is ready most of the time, you’ll play the 15 minutes that would take you to put it all together!
- The Room itself – In my practice room, I still keep all my heroes looking at me as I play and find it very stimulating to practice and get better. The desire to be as good as them still lives in me. Also, I have a comfortable chair and something to fight back temperature with as well. So, find the ideal room in your head and try to make it happen as close as possible.
- Plants – The presence of plants in a workspace can boost productivity by 47% according to a recent study conducted by the University of Exeter. This is because they are well-being and concentration boosters. So, don’t underestimate the power of indoor plants!
BONUS TRACK: Meditate
According to a very recent study by Columbia University, meditation and mindfulness can help you focus and increase your learning concentration.
Of course, besides an improved capacity for practicing guitar, you’ll also gain a myriad of other amazing benefits like reducing stress, and anxiety, and fighting back against any condition like depression.
Imagine if you could combine the anti-anxiety powers of guitar playing and meditation in one session. That’s exactly what I’m talking about.
The Bottom End
Learning how to play the guitar is embarking on a long trip that can take your entire life to complete. Yet, not all of us have a lifetime until we become proficient players.
These tips will help you flatten the learning curve. Moreover, they’re full of shortcuts, helpful exercises, and examples that will help you avoid common pitfalls and maximize your practice time.
So, play these techniques until you master them, and never stop being a student.
Your best guitar playing is always yet to come!
Happy playing!

Hello there, my name is Ramiro and I’ve been playing guitar for almost 20 years. I’m obsessed with everything gear-related and I thought it might be worth sharing it. From guitars, pedals, amps, and synths to studio gear and production tips, I hope you find what I post here useful, and I’ll try my best to keep it entertaining also.