
Have you ever listened to your playing and thought about how far that sounds from the records you love?
It certainly happened to me at some point, and I know it can be frustrating.
Even when you have high-quality gear at your disposal, crafting an amazing guitar tone may take years of experience and testing.
Luckily for us, the internet is a thing, and this age-old knowledge is easily shared nowadays.
So here are 17 hacks that can help you achieve a great guitar tone:
- Upgrade your pots
- Use the volume knob
- Use the tone knob
- Incorporate the middle pickup into your playing
- Add a treble bleed circuit
- Set pickup height properly
- Be aware of where you pick
- Be aware of how you pick
- Use a signal booster
- Use an EQ pedal
- Remember amp EQ settings are interactive
- Try lighter strings
- Use a slapback delay
- Rethink the order of your effects
- Take out some gain
- Crank your tube amp (or get an attenuator)
- Craft your sound in the context of the band
And as a footnote: You don’t really need fancy expensive gear to get a decent sound out of your rig.
Just keep reading to know how.
Let’s get to them one by one in more detail!
1. Upgrade your pots
Did you know that the volume potentiometers in your guitar have a significant influence on how the instrument sounds?
If not, you’re in for a treat.
Without going into too many technical details that might bore you, the rule is that the higher the value of your pots (500k, for instance) the brighter the sound will be.
250k pots tend to sound darker and are usually paired with single-coil pickups to tame a bit of their high-end chime.
Most volume potentiometers will have their value marked on their back, and it would be only a question of opening the electronics cavity of your instrument and just checking.
If you stumble upon something like a 300k pot, you will have the option to go towards a higher value, for a brighter tone, or even lower if you prefer a more muffled sound.
All of these references are for passive pickups since active pickups use way lower value pots.
This mod is one of the cheapest and most influential things you could do to your guitar, and for a lot of players, it’s a day and night difference.
2. Use the volume knob
One of the eldest tricks in the book, from when there were not many facilities for shaping your tone in form of pedals and effects as there are today was to control your sound with the volume knob.
And hey, don’t get me wrong, I’m not saying it’s not common nowadays.
In fact, if you don’t do it, I urge you to try it.
Depending on your amp and the quality of the pots on your guitar, tweaking your volume slightly will not influence as much the loudness of your sound, as many beginners might think, but how hard your guitar signal hits your pedals and amp.
The harder your signal hits them, the more “broken” your sound will end up, so this is a great way of controlling gain.
Just set up your rig to sound a little bit overdriven at full volume, and then turn down your guitar’s volume, you will hear how the sound cleans up.
This is a great way of achieving different textures for your overdriven tones.
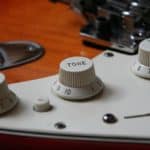
3. Use the tone knob
Many players, myself included, tend to neglect the tone knob or knobs in their guitars.
This is a really bad habit, and we are actually leaving a lot of sound-shaping potential on the table.
As you know if you own a guitar with tone knobs, as you close them the sound gets darker until it reaches a pretty characteristic sound.
A completely closed tone pot might be a bit too much for most genres other than jazz, however, finding sweet spots in between for certain songs or passages will allow you to say a lot more things with your guitar for free.
4. Incorporate the middle pickup or position into your playing
Another neglected feature a lot of guitars have is a middle pickup.
Did you know it’s not only for combining it with the other ones?
This is also true for 2 pickup guitars with a middle position in the selector.
There’s a particular sound for middle positions that might be an acquired taste for many.
In my case, I think about it as a neutral tone.
When I don’t want my guitar to sound too bright or too dark, I go for the middle position of the switch.
This works great for rhythm parts, or for melodies that don’t require a particular emotion or color to them.
Try it, and find a way of incorporating that sound into your playing.
5. Add a treble bleed circuit
Treble bleed circuits are another simple and cheap mod for your guitar electronics.
What they do is allow for high frequencies to still bleed into the output signal when the volume pots are turned down.
Most affordable guitars with cheap electronics lack this simple feature and when you tweak their volume knobs you will note that the sound darkens as if you were also adjusting the tone.
If you are constantly rolling the volume of your guitar up and down, this mod is a must-have for you.
6. Set pickup height properly
Pickups are magnetic devices, and they have a pull on the strings.
A pickup that’s too close to them will have a slightly higher output, but also an impact on sustain. For single-coils a side effect could also be increased feedback and unwanted extra high-end.
On the other side, a pickup more receded into the guitar body will have a quieter output, but not as many drawbacks as you could imagine. Sustain would be increased, and you will gain a bit of a more articulate sound.
Now, finding the exact height that works towards the sound you plan on achieving is not an exact science and I encourage you to grab a screwdriver and dedicate a few minutes to experiment with it.
This is another free mod that could make your tone go a long way.
7. Be aware of where you pick
The place where you pick your notes along the strings will greatly influence the sound your guitar makes.
The closer to the bridge, the brighter it will sound, and the further towards the neck the darker.
This is because a different set of harmonics are triggered or emphasized making the string vibrate slightly different.
Most likely you already know this, but I suggest you pay special attention to it next time you grab your instrument.
Deciding consciously where to place your pick can add an extra dimension to your riffs and solos.
8. Be aware of how you pick
Not only the material of your pick, or even the decision of picking with your fingers has a great influence on your tone, but also how you use your plectrum in terms of pressure and surface.
Try slanting your pick at a different angle, or using a slightly different part of your fingertips or nails when vibrating the strings.
Again, not only knowing but being aware of these small differences in sound when playing is what separates pros from beginners, I can assure you.
9. Use a signal booster
Your guitar signal deteriorates due to external factors such as interference as it travels across your rig.
This tonal decay is mainly manifested in a lack of high-end in the final tone.
A way of preventing this issue is by using a signal booster or buffer.
There are dedicated pedals that do this, which are voiced in particular ways to compliment your sound, but there are also buffered pedals such as tuners or wah-wahs most commonly that also serve this function.
Buffers are commonly placed at the beginning of your signal chain, however, if your guitar’s output has a long travel to the amp or output device, a second buffer down the line might be useful.
Again, experiment, and decide with your ears.
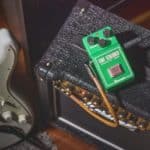
10. Use an EQ pedal
An EQ pedal is the ultimate tool to shape and tweak your tone to the smallest detail.
A lot of players prefer using it just before their overdrive or distortion pedals to reach them with an already filtered or boosted sound.
Others choose to place them further down the chain before modulation effects.
Some others, with a more mixing engineer approach, place them at the very end of their chain, in the effects loop before the return to the amp.
And I have also heard of people that use multiple EQ pedals at different points of their rig.
Whatever you choose to do, if you feel that there’s something lacking in your tone, try experimenting with such pedals.
My advice is that you always start taking off from the tone, before choosing to boost certain frequencies.
11. Remember amp EQ settings are interactive
If you are dealing with a real amp, and particularly with vintage tube amps, take into consideration that their EQ knobs don’t work as those of hi-fi audio units.
Moving any knob will have a different effect on the final tone depending on the position of the other knobs.
This is why I refer to them as interactive.
Boosting the low-end will probably also cut some high-end, so you should have to compensate for it, and the same is likely true for the opposite tweak.
Even volume and gain might also shape how the tone filters work, and even how much compression the whole unit brings to the audio signal.
I’m not saying you should learn to detail how everything works, but just learn to tweak and find your tone with this in mind.
My recommendation is to always start with every setting (perhaps except volume) at 12 o’clock and work from there.
12. Try lighter strings
Contrary to what many people think, lighter guitar strings are not a synonym for a thin weak sound.
Quite the contrary.
Thick strings might even sound dull and dark, while thinner strings, apart from being easier on the fingers, tend to have a certain chime that might be great for playing broken chords among many other things.
Next time you go to the store get a set of 08s.
You can thank me later.
13. Use a slapback delay
A slapback delay is an echo effect set to a very short time setting.
When you play a note, it immediately comes back to you, almost like a reverb, but not quite.
In certain venues where the acoustic is a bit off, or things just don’t sound right, a slapback delay might make you sound bigger.
Check it out, this is a bit of a polarizing one.
You might love it or hate it.
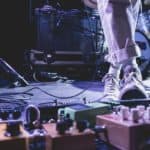
14. Rethink the order of your effects
A lot of us just set up our rigs and forget about them for months.
Sometimes we also do things a certain way because that’s the “intended” manner of doing so.
For instance, when ordering our pedals.
There are no actual rules, but conventions.
So, there’s nothing wrong with putting a compressor pedal before or after overdrive if that sounds good to you.
Even placing it at the end of your signal chain, in the loop, before returning to the amp could give you a certain color to your tone that otherwise was impossible to achieve.
Mix your modulation section around.
Try stupid things as distortion after delays.
Tweak, experiment, and don’t take things for granted, since you might find your new favorite sound in the most unorthodox way.
15. Take out some gain
We sometimes think gain is the solution to all of our problems.
What if I told you it isn’t?
I can assure you you are probably using more gain than you need right now.
Just for the sake of it, roll it back a bit and see if things work out.
I might be wrong, but it’s worth the check.
Also, consider gain staging.
This is to stack different gain sources along your rig such as an overdrive pedal or a booster with your amp, instead of using a unique source for your dirt.
The interaction between level and gain settings between different units might lead to great ways of shaping your tone.
For instance, between metalheads, it’s very common to use a tube screamer in front of the amp to hit it with a hotter signal and then set a lower gain setting on it compared to what would be required if the overdrive pedal was not there.
Finally, I read somewhere about a rule of thumb that says something like “The louder you play, the less gain and bass you will need”.
And I think that’s really a great motto to live by.
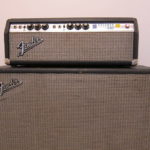
16. Crank your tube amp (or get an attenuator)
Tube amps sound better at higher volumes.
There’s nothing to do with it.
A recommended way of using them is to just crank them and then roll down the volume on your guitar, or use a volume pedal if you need to clean up your sound.
However, a cranked tube amp might not be viable in many venues or rehearsal places.
For this, there are mainly 2 alternatives, or 3.
The first one is getting a smaller tube amp or one with settings that allow running it at half power or even less.
With this, you get the tonal benefits while you also get to keep your eardrums not punctured.
The second alternative is getting an attenuator, which is a unit that sits between your amp and the speaker cabinet and as the name implies makes it not as loud.
Finally, and not really an alternative: Just ditch the analog gear and go digital.
17. Craft your sound in the context of the band
Finally, but not least important, always think about the context when dialing down your guitar tone.
A sound that works great for noodling in your bedroom will most likely not fit in the context of 3 other musicians fighting for that precious midrange of frequencies while live, or in the studio.
Think of the frequency spectrum as limited real estate and try to fit your sound into it, considering which spaces will other members of your band also require.
Also, conceptualize it as a moving thing, like a theater play where actors come and go from the center of the stage.
Perhaps you should need to boost your mids when the vocals give you some space to solo, and then cut them back when you need to play rhythm in the background.
Great guitar tracks on songs usually don’t sound as good when isolated.
Think about that.
Hello there, my name is Ramiro and I’ve been playing guitar for almost 20 years. I’m obsessed with everything gear-related and I thought it might be worth sharing it. From guitars, pedals, amps, and synths to studio gear and production tips, I hope you find what I post here useful, and I’ll try my best to keep it entertaining also.